Setting up AWS
Introduction
AWS provides users with a wide range of tools for launching and monitoring distributed compute jobs with varying stability and pricing needs. This makes it a great option for researchers who need to rapidly test and iterate on experimental ideas and who need to test the effects of hyperparameters at scale. This tutorial will show you how to create a simple AWS image and how to boot an instance from this image in order to run your code.
Log in to your AWS account
Go to AWS console login page and sign in with your AWS account.
Launch instance (with images for example)
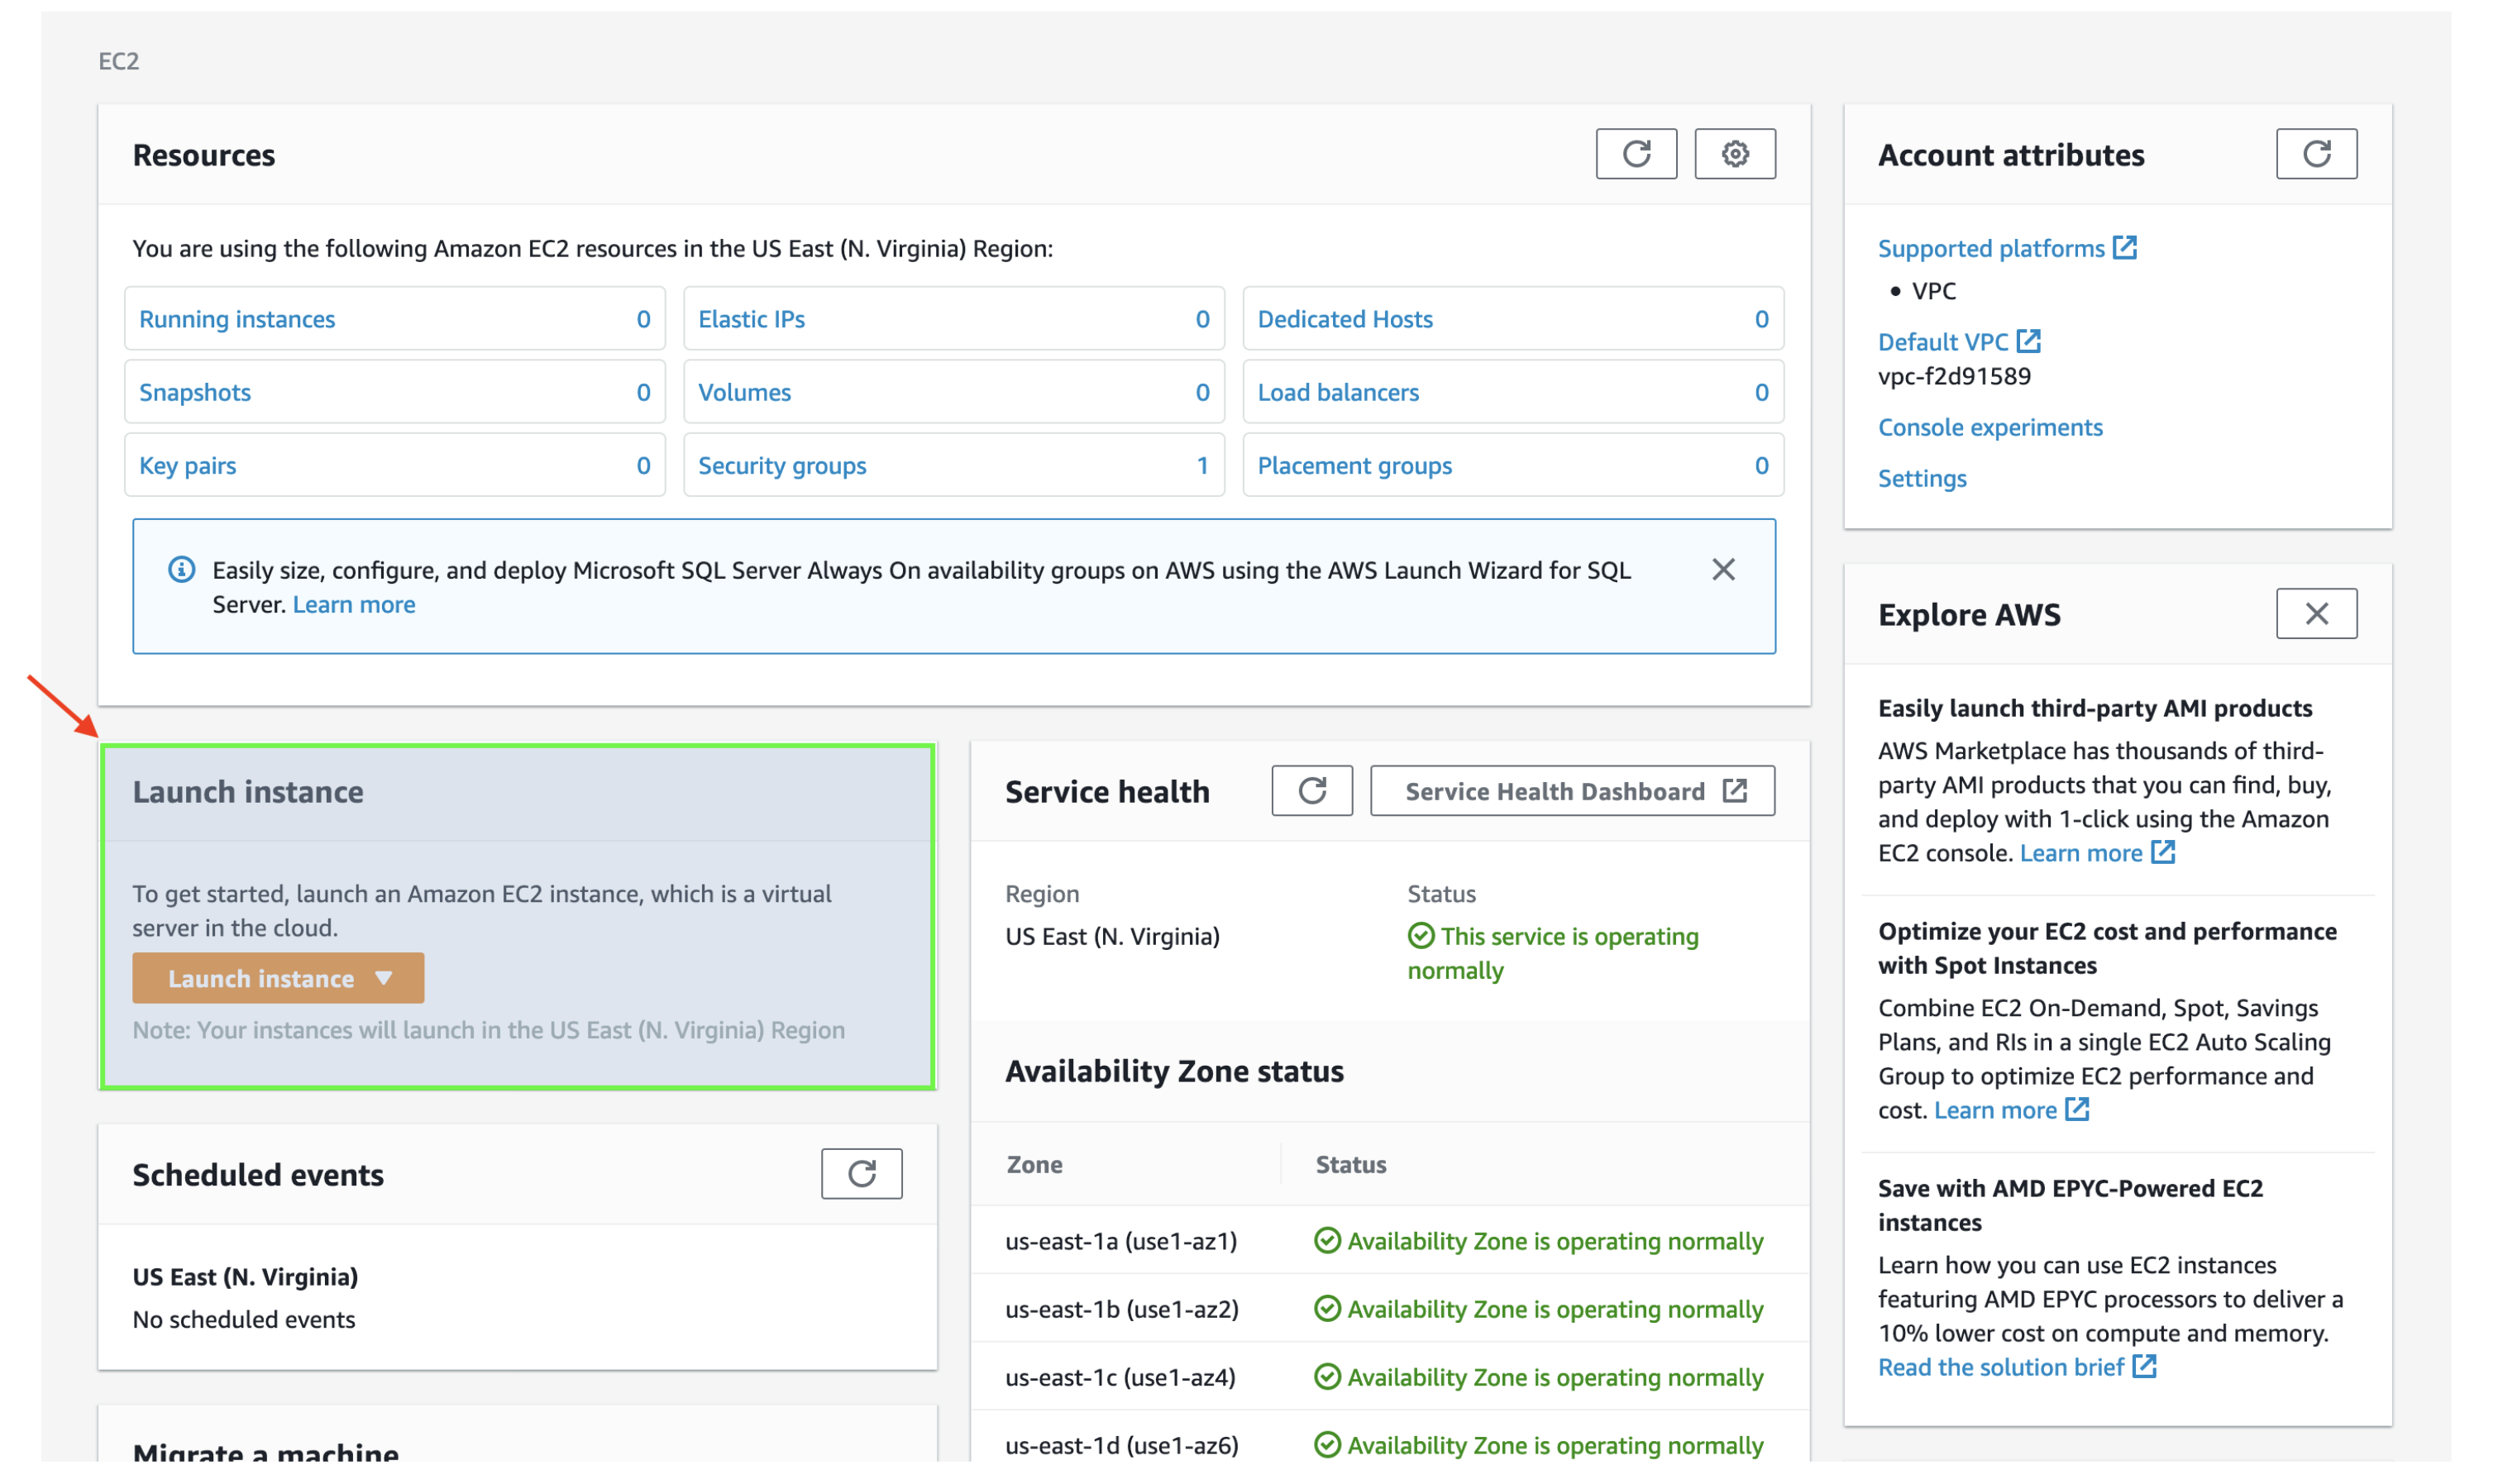
1) Click the “Launch Instance” button.
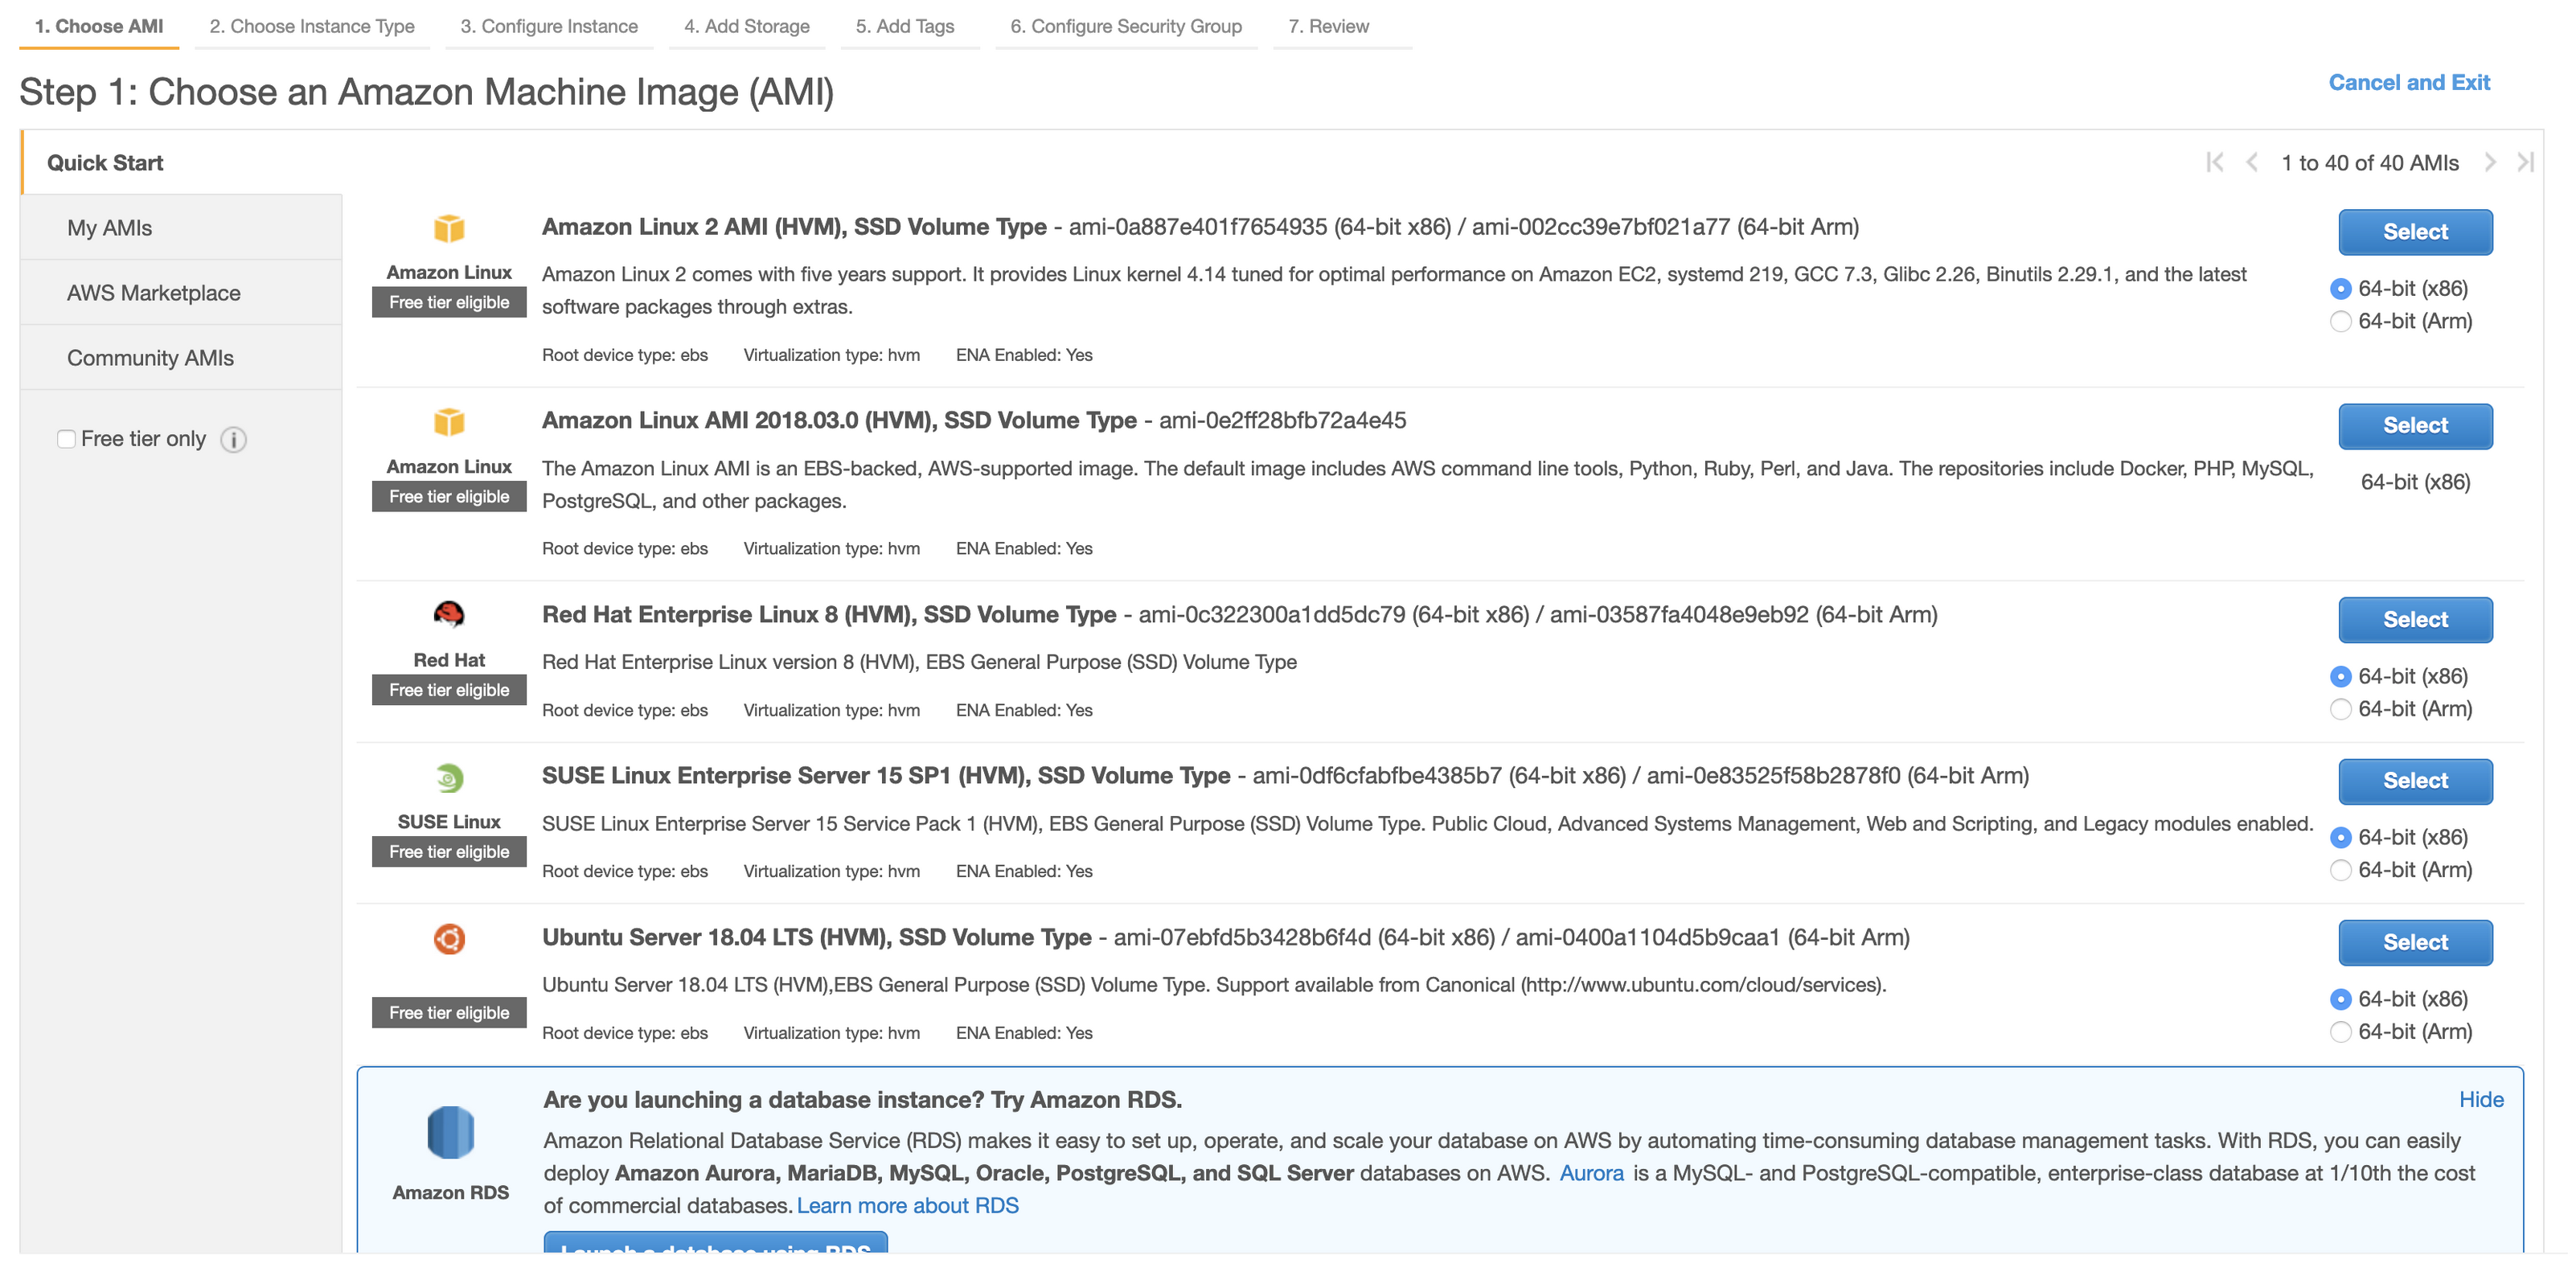
2) Select ubuntu 18.04 as your boot image.
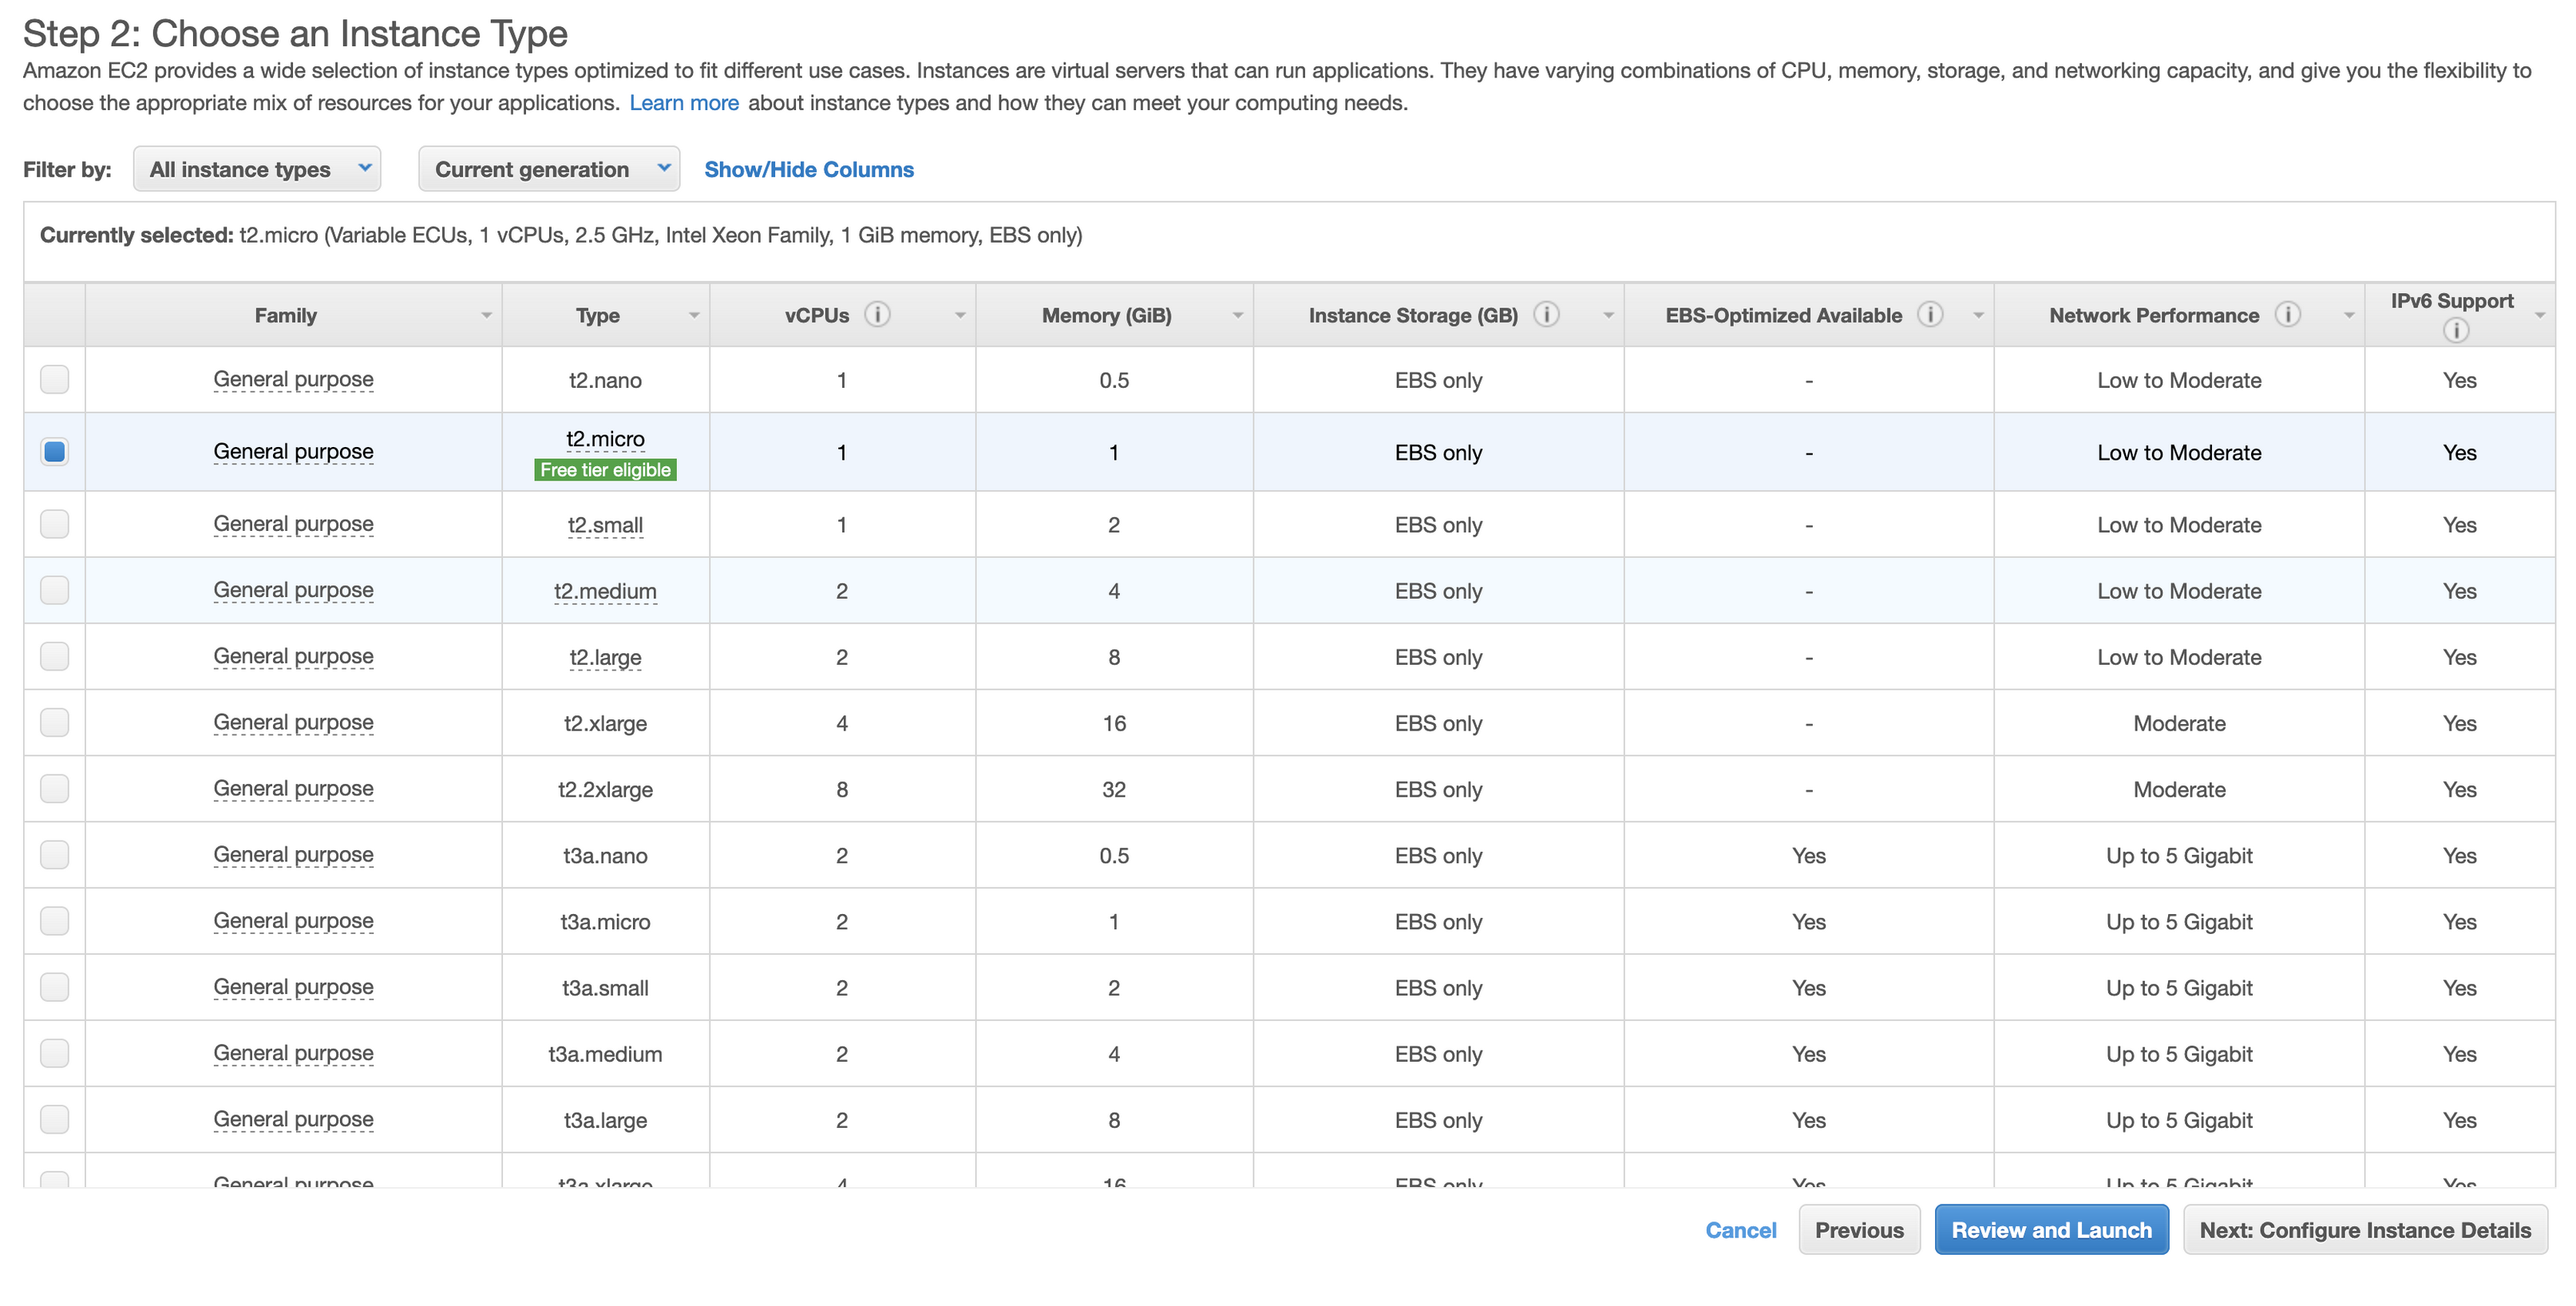
3) Select a free tier eligable instance (we are only using this instance to install requirements so no need for large compute.)
4) Download .pem file
Click the “Download Key Pair” button shown below.
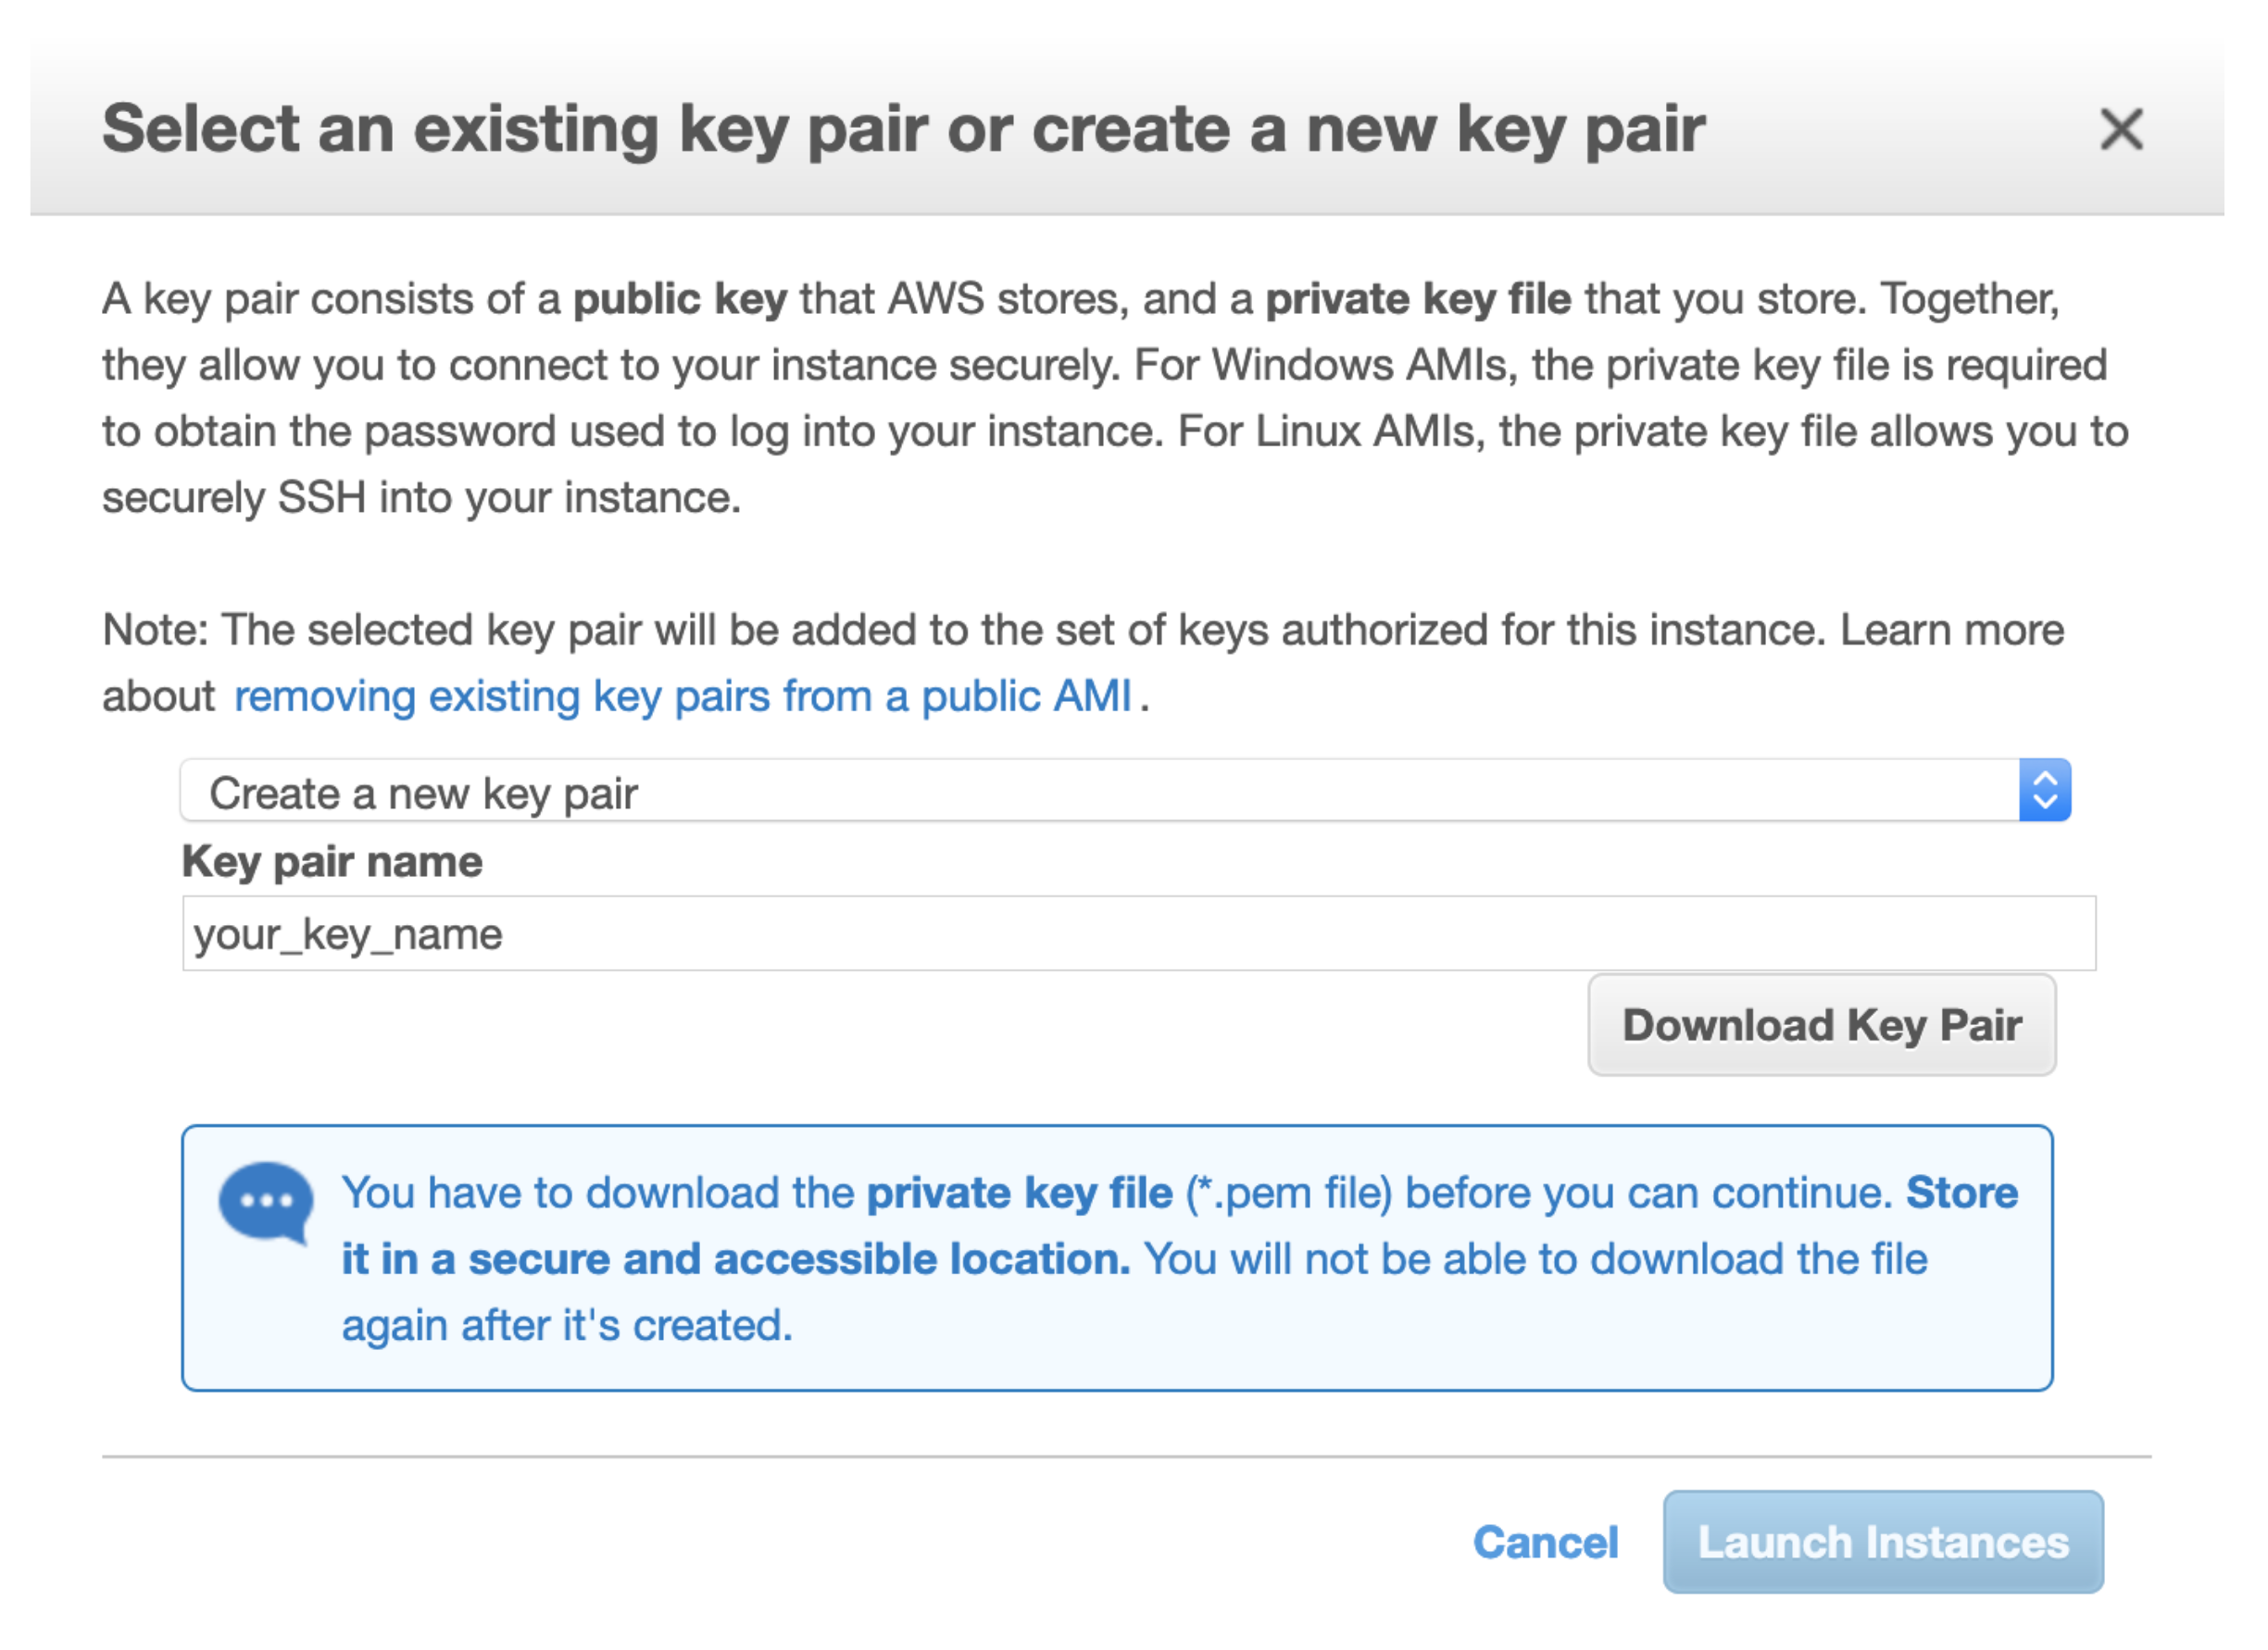
This will download your .pem file which will serve to identify you to amazon when using the command line API or connecting to your instances remotely. Copy this file to a known location.
This key will be used to identify you over ssh or when using AWS with command line.
mkdir ~/.aws_keys
mv /path/to/downloaded/.pem ~/.aws_keys/nameofkey.pem
Connect to your instance
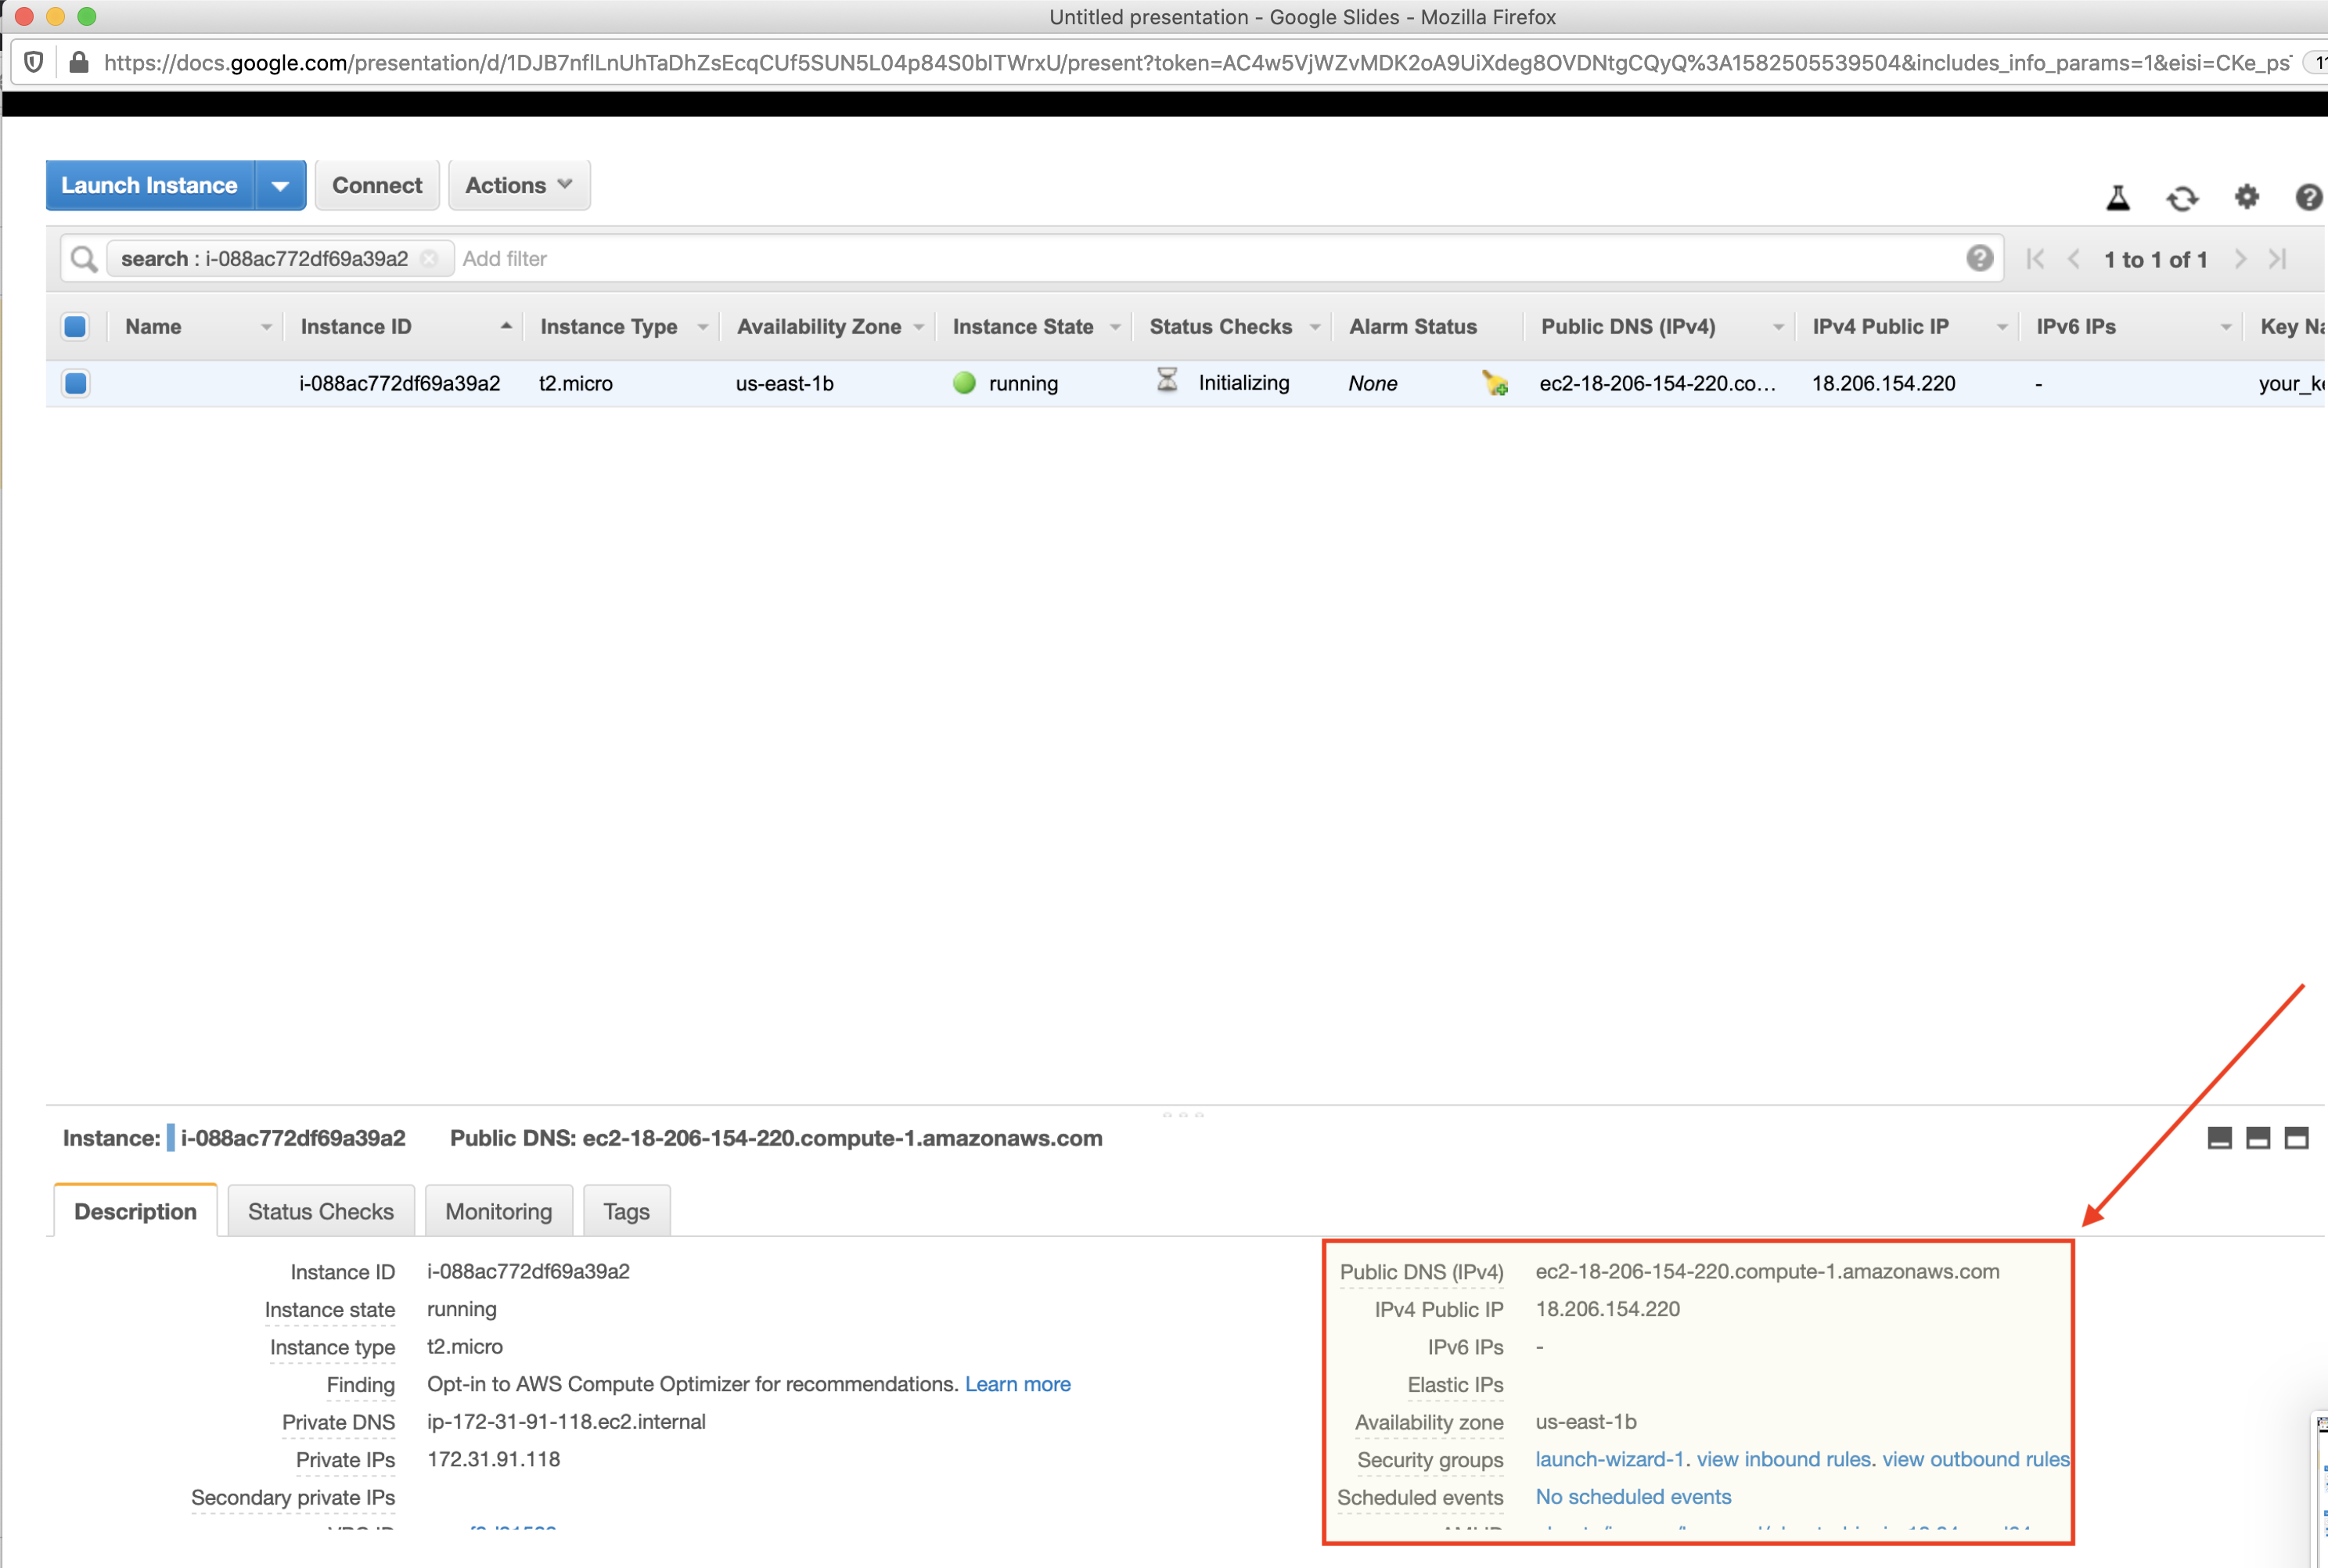
Once your instance is running (denoted by the green status symbol in the instance state column), you can connect to your machine and make changes.
In the AWS console, you will find a public IP address for your instance (as pictured below):
ssh -i /path/to/your/.pem ubuntu@yourpublicip
Once connected you can install any software, packages, or docker images as well as store any files you would like present in all of your experiments. For persistent file storage, it is preferable to store files on a file server or on AWS s3 storage for ease of access.
If running doodad to launch experiments (details later), install docker and unzip prior to making your snapshot.
It is beneficial to do this now, as you will create a snapshot of this instance that you can boot from in the future.
Make a snapshot.
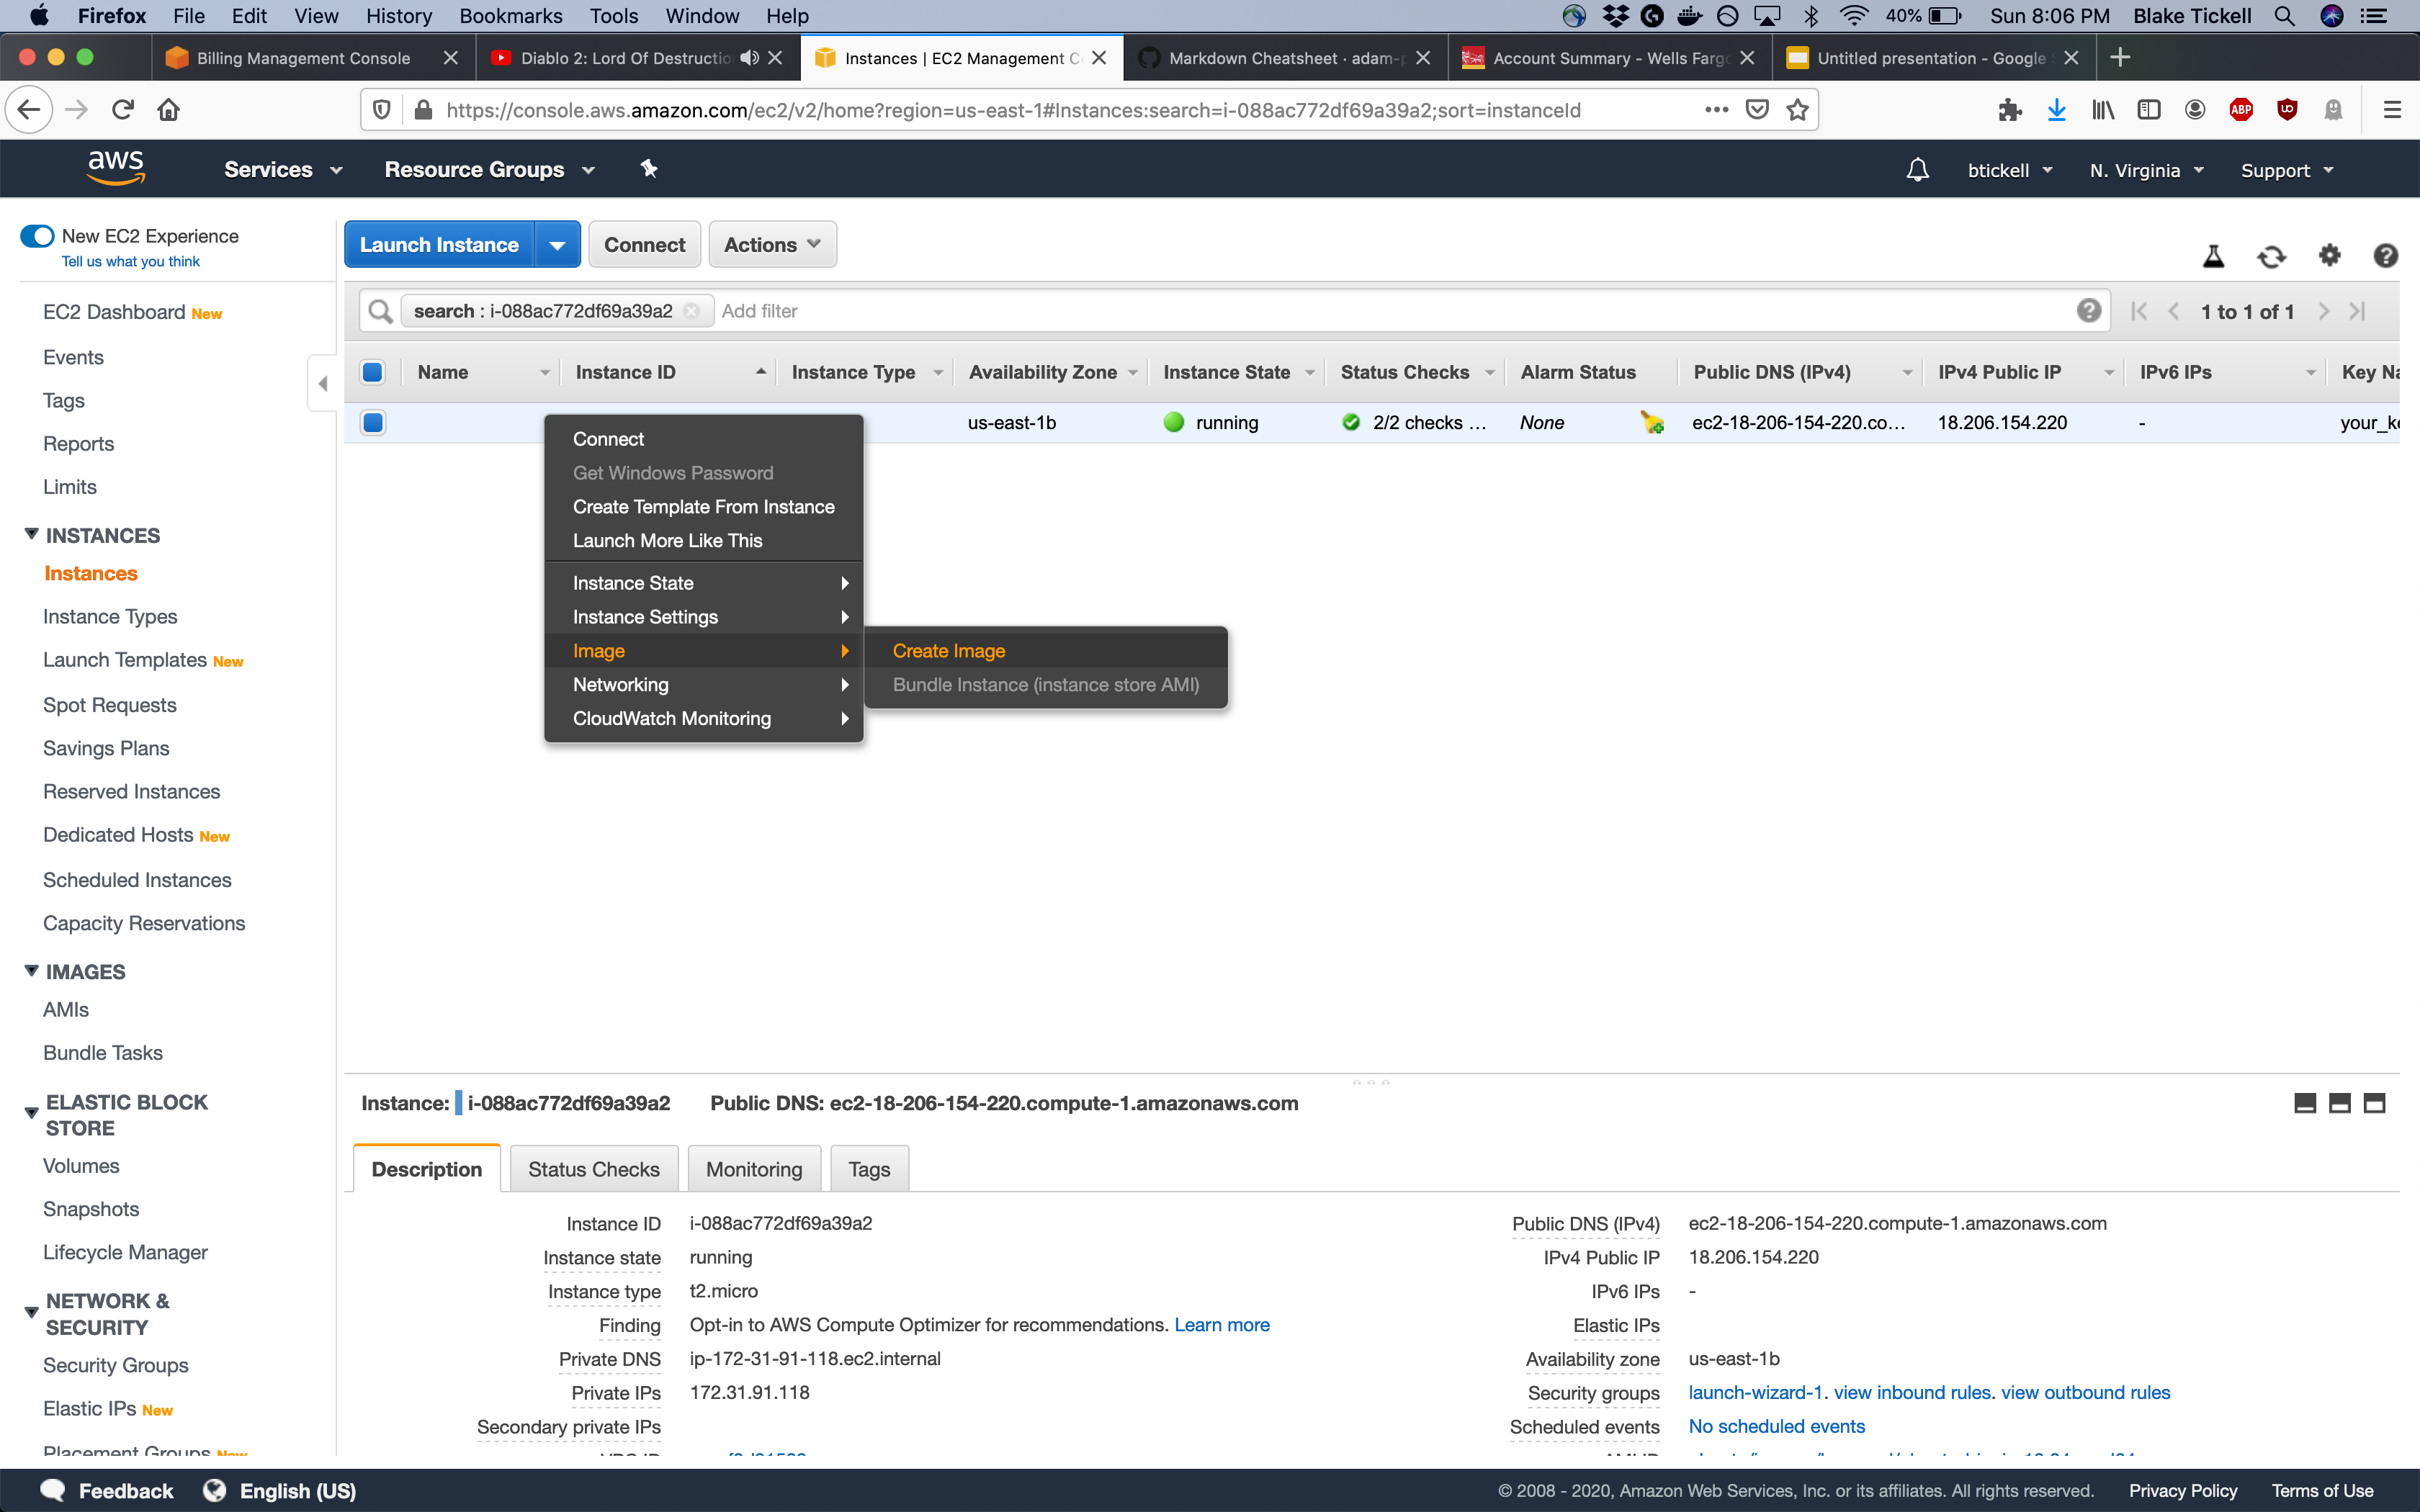
We now have a single instance with our desired software and configuration. In order to launch instances using this configuration, we need to create a snapshot which will create an image (AMI). This creates an AMI based on a target instance that can be booted from many times.
To do this, right click on your instance in the AWS console and select create snapshot:
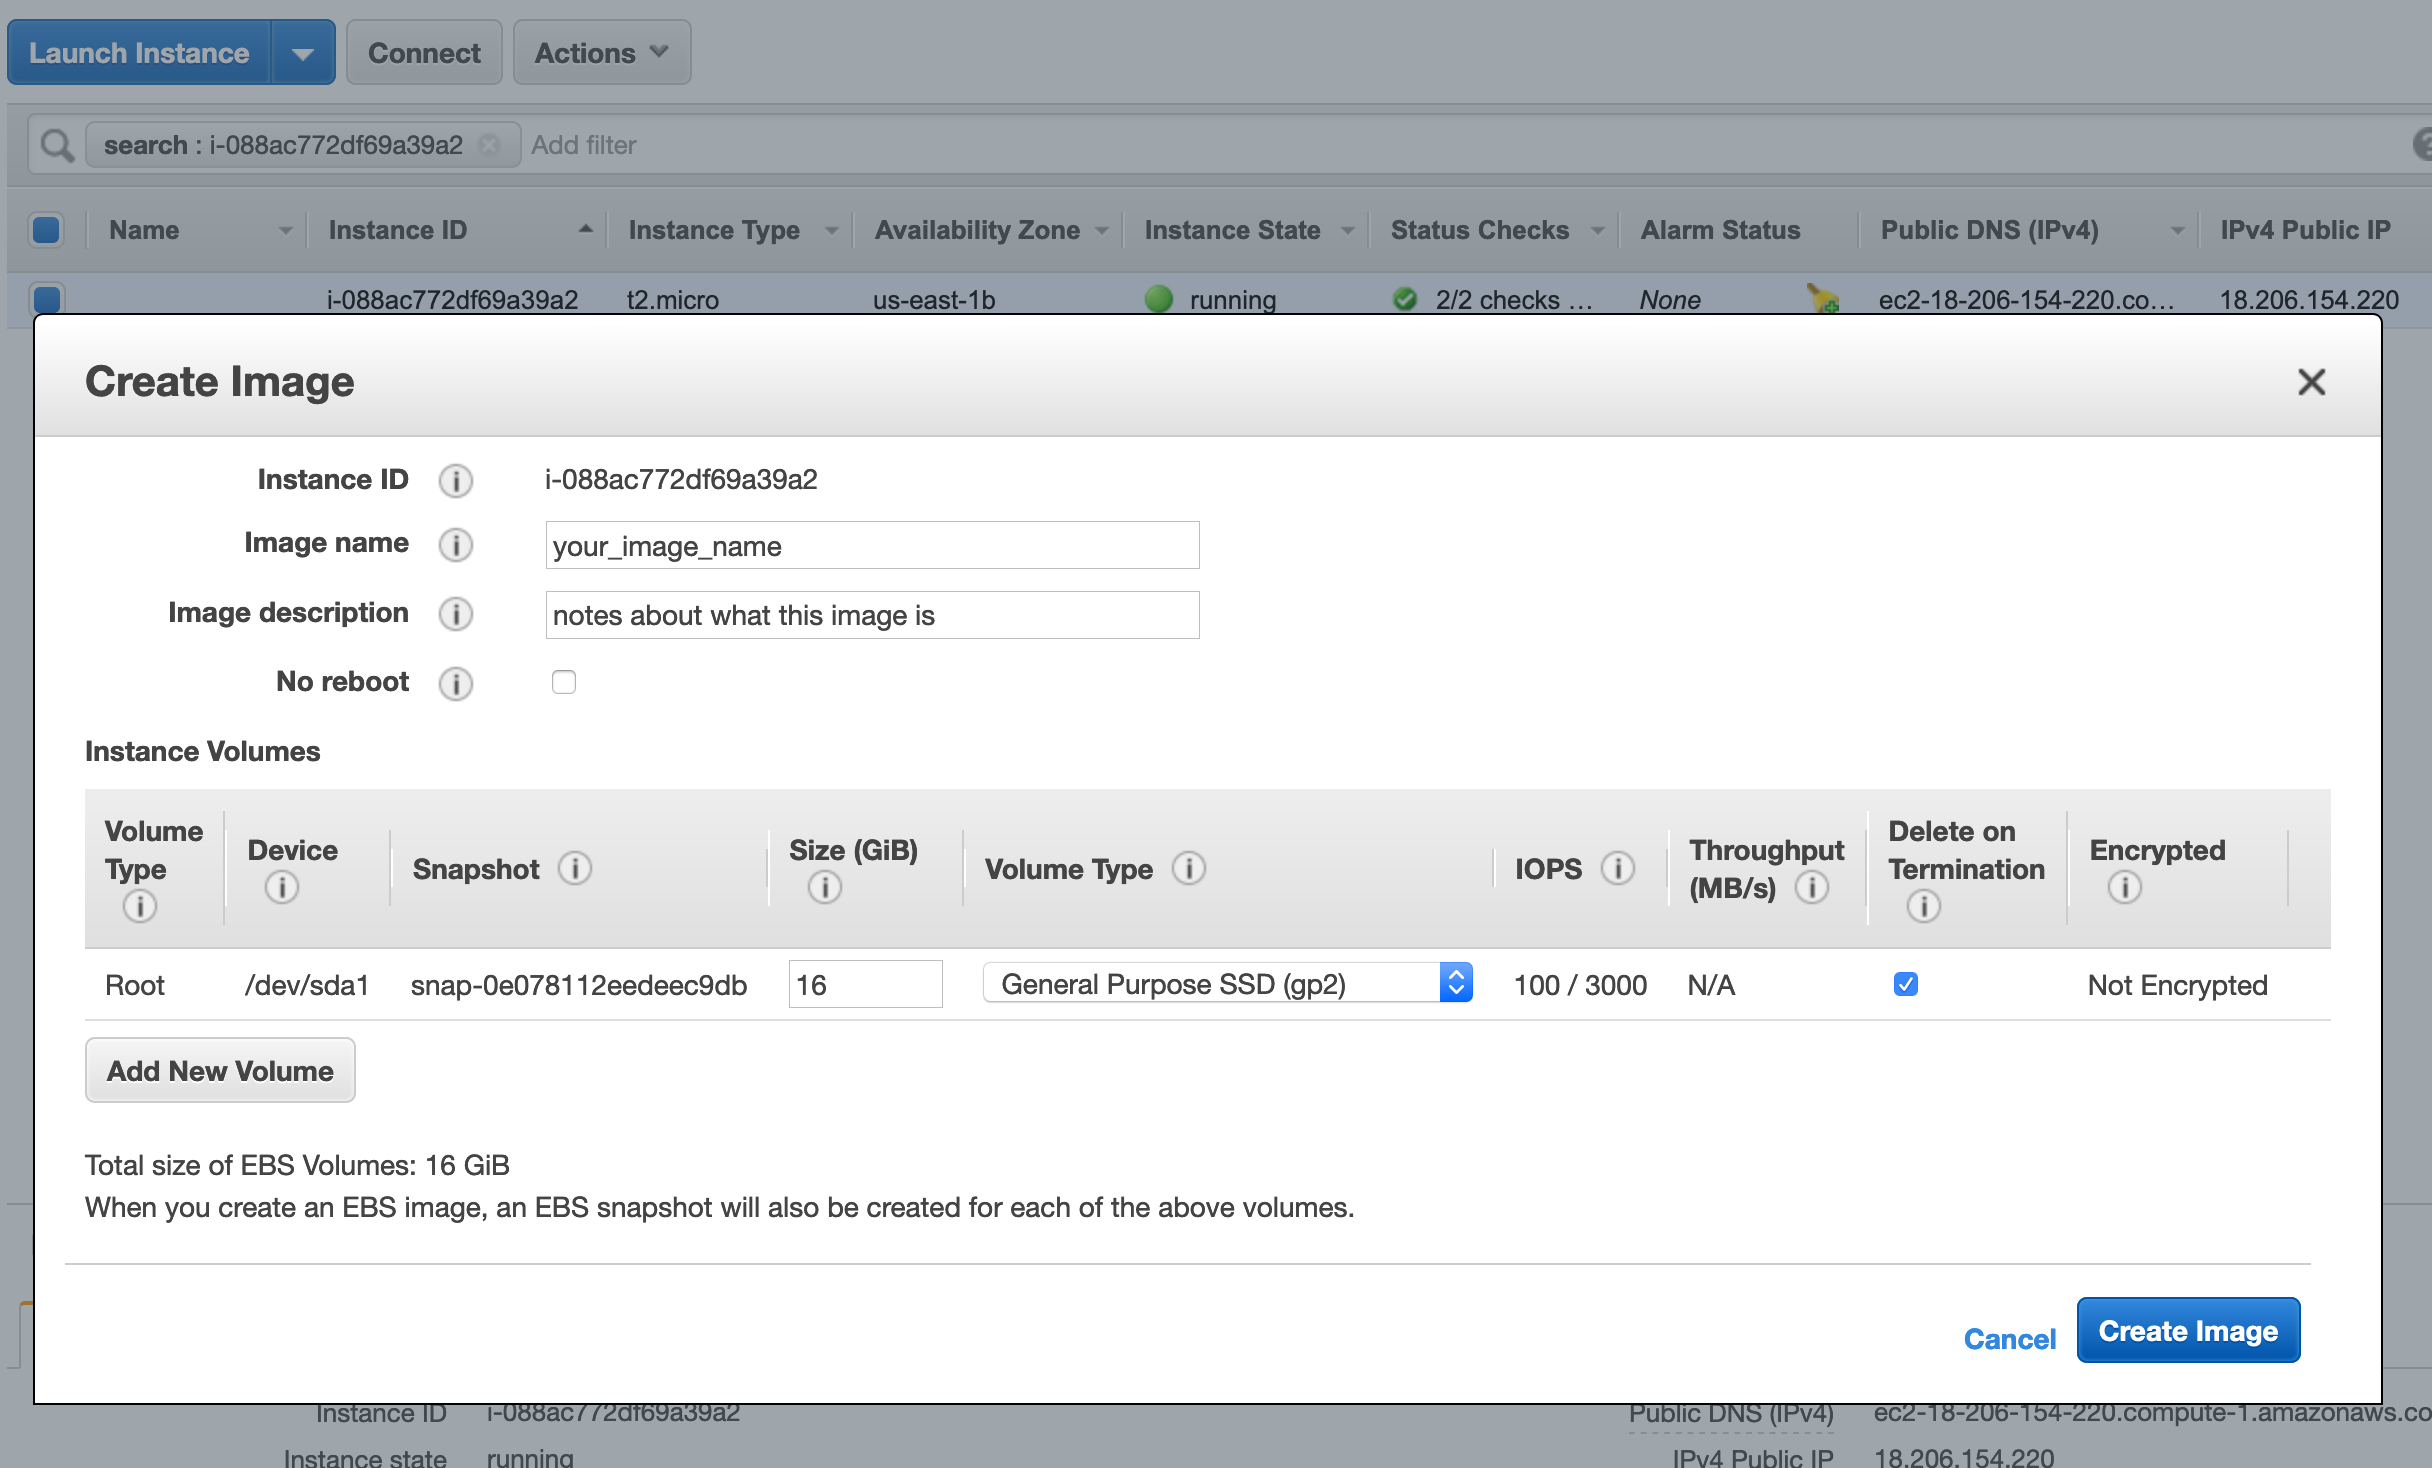
You are now able to launch as many instances from your created snapshot as you want to run experiments as needed.
Important Info:
If you lose your .pem file for a keypair, you will need to recreate any instances using that security key with a new keypair.
Spot instances vs On demand instances
price vs reliability
Region:
affects price and pool of machines available
How can you launch many jobs at once? (Doodad :D)
Running with Doodad
Doodad is a python package that allows you to quickly launch requests for spot instances with a specified price which is often much cheaper than on demand instances created through the console. With doodad, you can spawn many seeds of a given experiment and log results to reliable AWS storage or an EC2 experiment server.
Install AWS command line interface
sudo apt-get update
sudo apt-get install awscli
Once installed configure:
aws configure
Set your access key and secret access key to match those found on your amazon account. Set the default region to “us-west-1”
Install doodad
git clone https://github.com/justinjfu/doodad.git
cd doodad/
git checkout v0.2 # This is the version that supports AWS
Now we need to add doodad to our $PYTHONPATH environment variable so python can find the library
export PYTHONPATH="$PYTHONPATH:/path/to/doodad/"
Once installed run the EC2 setup script in scripts/
python scripts/setup_ec2.py
Launching a script
Lets say we have an example script doodad_test.py which takes a single argument input and prints it to the command line:
import doodad as dd
args = dd.get_args()
print('Hello, my input argument is {}'.format(args['input']))
To run this script with doodad, make sure you have created a bucket on s3 (through the EC2 console) and run the following code:
import doodad as dd
from doodad.utils import EXAMPLES_DIR, REPO_DIR
mode = dd.mode.EC2AutoconfigDocker(
s3_bucket="BUCKET_NAME",
s3_log_prefix='YOUR_EXPERIMENT_DIR_NAME', # Directory where you want to save logs and result files
s3_log_name='EXPERIMENT_NAME', # Subdirectory of log prefix to store this specific run
image_id="YOUR AMI ID HERE", # i.e ami-042a54dfae89d0418, get this from the details on your snapshot
aws_key_name='KEY_NAME', # what you named your key pair when you created your instance.
instance_type="INSTANCE_TYPE", # i.e t2.micro
region='REGION', # i.e us-west-1
terminate=True, # This specifies whether instance should terminate after completing your script.
spot_price=.33, # Check this on the ec2 spot request calculator (set slightly above min price)
image='python:3.6.10-buster', # Docker image to use from either dockerhub or already on the instance.
)
mounts = [
dd.mount.MountLocal(local_dir=REPO_DIR, pythonpath=True)
]
args = {'input': 'MIT!'}
dd.launch_tools.launch_python('doodad_test.py', args=args, mode=mode, mount_points=mounts)
This code does a few important things:
1) Creates a doodad mode, specifying all the parameters of the instance(s) being created.
2) Specifies that the instance should terminate when the target script is done executing.
3) Designates that all log files saved by doodad should be saved to s3 storage, located at path s3://BUCKET_NAME/YOUR_EXPERIMENT_DIR_NAME/EXPERIMENT_NAME
5) Constructs argument dictionary to pass to our script. It has a single argument input with value "MIT!"
6) Launches doodad_test.py to run on the described instance, using docker image DOCKER_IMAGE
For a comprehensive list of instance types and their current spot pricing see https://aws.amazon.com/ec2/spot/pricing/
Mounting Files (AWS)
For the above example, our script was simple and didn’t require any additional code or data to run. Now lets say we have two directories, utils/ and data/
In utils/ we have a script metrics.py:
import numpy as np

def get_metrics(x):
	return np.mean(x), np.std(x)
Our script compute_metrics.py computes the mean and standard deviation of the data:
from utils import get_metrics
import numpy as np

x = np.load('data/example_dat.npy')
mean, sd = get_metrics(x)

with open('/outputs/results.txt', 'w+') as f:
	f.write("My mean is {} and my sd is {}!".format(mean, sd))
In order for this code to run correctly, we need to mount our code from doodad when launching our instances. To do this we modify the original code block:
import doodad as dd
OUTPUT_DIR = '/outputs'
PROJECT_ROOT = 'path/to/your/project/'
code_mount = mount.MountLocal(mount_point='utils/', local_dir=PROJECT_ROOT+'utils/', pythonpath=True)
output_mount = mount.MountS3(s3_path='results/', mount_point=OUTPUT_DIR+'results/' , output=True)
mounts = [code_mount, output_mount]
Then when we run our code as before, we pass the mounts list to
run_python('doodad_test.py', mode=mode_obj, mount_points=mounts)
This code is very similar to before but has two mounts with important arguments.
1) The code mount specifies pythonpath=True, which will automatically append the location of the mounted directory to your python path on your spawned instances.
2) The output mount is a designated location where your script can store things that will be synced to storage by doodad. The argument output=True specifies that the mount is an empty directory to be created by doodad, and that any files you write into the mount_point directory, will be saved to storage.
And we are done. You should now be able to launch arbitrary code to a wide array of dynamic compute instances depending on what you require.